Annual Budget Processing
Welcome to the New World ERP Annual Budget Processing guide. This manual will guide you through both the setup and processing aspects of Annual Budgeting Processing. The document is organized into two sections:
System Administration. This section focuses on the setup components necessary to utilize Annual Budget Processing within New World ERP. This will include detailed information on master files that must be set-up such as Budget Levels and Budget Methods and will also include the security settings which will be utilized to enable workflow and tailor user options to your needs.
End User Processing. This section describes the steps, workflow and options available in Annual Budget Processing to the end-user. It will guide you through the process from budget initialization, to budget adoption and budget adjustments. Included in the section will also be a guide to the standard reports available in the software.
System Administration
General Ledger Account Set-Up
When creating the revenues and expenses within the chart of accounts, the Account Status setting within each General Ledger Account will drive whether an account is included in Annual Budget Processing.
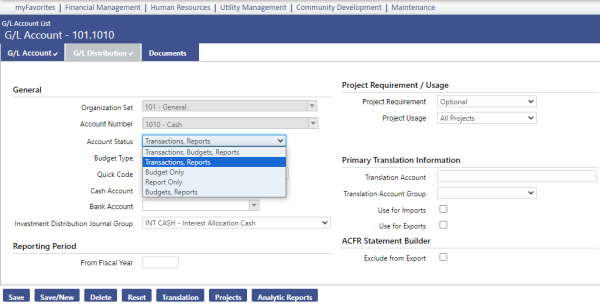
Maintenance > new world ERP Suite > Chart of Accounts > GL Accounts>List. Then open a GL Account.
The selection in the Account Status field must include “Budgets” in order for the account to be included in the Annual Budget Processing.
There are three Account Status selections that involve Budgets.
Transactions/Reports/Budgets - Most frequently, a budgeted revenue or expense account will be set to Transactions, Budgets, Reports. This indicates that the account is available to be used for current transactions and should also be included in the Annual Budget Process.
Budget Only – This setting can be utilized when an account should not be available for transactions but is desired within the budget. A scenario for this method would be if a new GL account is being created for use in the following fiscal year. This setting can be used to get the GL account in the budget while leaving it unavailable for transactions in the current fiscal year. The status of the account would need to be changed to Transactions/Reports/Budgets in the next fiscal year to make it available for transactions.
Budgets/Reports – This selection has a specific purpose and is intended for use with GL accounts that are using Base and Detail. If a base/detail combination has been established for a group of accounts where budgeting is being done at the Base Account level and transactions are being recorded on the Detail Accounts, then the Account Status of the Base Account should be set to Budgets/Reports. This will allow for entry of budget amounts at the base account (for example – Office Supplies), while the detail accounts (for example, Office Supplies – Paper) would be set to Transactions/Reports to keep them out of Annual Budget Processing. The budget would then be applied to the base account and all transactions would be recorded to the detail accounts, which would be summarized to validate against the base account budget.
Company FM Settings
The Company FM Settings area contains universal setting that will control system behavior within the Annual Budget Module.
Annual Budget Setting Tab
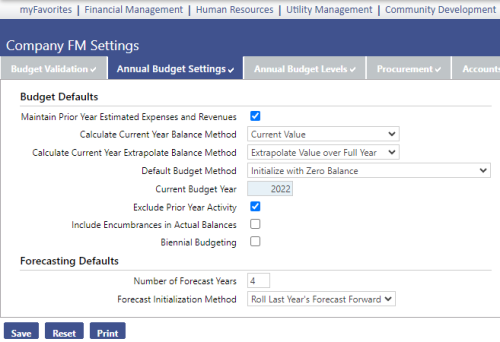
Maintenance > Financial Management > Company FM Settings>Annual Budget Settings tab
Budget Projection Control
Current Year Projections in Budget Entry and the Budget Worksheet
Budget Projections can be utilized to generate projections for the current year for reference purposes in the Budget Worksheet and also as available columns in the budget entry.
There are two settings which will drive the behavior of Projections:
Calculate Current Year Balance Method – This option allows for the selection of what the projection should be driven from. There are two options:
- Current Value: The year to date value, up to the current date, will be utilized for the calculation.
- Value as Of a Certain Date: If this option is selected, an additional field will appear on the screen requesting the through month to utilize.
Calculate Current Year Extrapolate Balance Method – This field is used to select the calculation that will be utilized. There are two options:
- Extrapolate Value over Full Year – With this selection, the calculation will take the value as of the date method designated in the Calculate Current Year Balance method and make the following calculation: (Calculate Current Year Balance Method Value/# of days (YTD)) * 365.
- For example, if Current Value was selected, the date today is October 31 and the balance in the account is $5,000, then the calculation would be ((5,000.00/304) x 365)) = $6,003.00.
Extrapolate Based on 5 year History – With this selection, the calculation will take the value as of the date method designated in the Calculate Current Year Balance method and make a projection based on a historical average of the YTD % of the total year. The calculation is: (Calculate Current Year Balance Method Value/ Average).
For example:
The current fiscal year is 2012. The current date is 10/31/2012. The current amount expensed for the GL Account this year is $5,000.00.
5 Year History:
|
|
|
|
|
|
|
|
|---|---|---|---|---|---|---|
|
F/Y |
YTD 10/31 |
YTD 12/31 |
% of Total |
|
|
|
|
2011 |
$5,500.00 |
$6,200.00 |
89% |
|
|
|
|
2010 |
$5,400.00 |
$6,500.00 |
83% |
|
|
|
|
2009 |
$4,700.00 |
$5,900.00 |
80% |
|
|
|
|
2008 |
$4,500.00 |
$5,600.00 |
80% |
|
|
|
|
2007 |
$0.00 |
$4,000.00 |
Not included |
|
|
|
|
Average |
|
|
83.0000% |
|
||
|
|
|
|
|
|
|
|
|
|
|
|
|||
The Average is calculated to be 83.0000% (+89%+83%+80%+80% / 4).
|
The projected value would then be: 5,000.00 / .830000) = $6024.00 |
|---|
Default Current Budget Method – The selection in this field will allow users to choose a Budget Method that they would like to have defaulted to all of their Account Classifications prior to initializing the budget. These defaults can be overridden for each Account Classification in the Budget Methods screen in Financial Management > Annual Budget Processing > Budget Preparation.
Current Budget Year - This field should reflect the year that you are currently budgeting in Annual Budget Processing. This will generally not be the current fiscal year in which you are operating but the following fiscal year which is being budgeted.
Exclude Prior Year Activity –If this check box is selected, it indicates that the system should disregard transactions flagged as prior year fiscal activity related to carry-over purchase orders when initializing the budget and on reports that display historical data.
Include Encumbrances – This will include encumbrances in actual balance columns that you can view when users are entering in their budget amounts.
Biennial Budgeting - Back in the Current Budget Year field, type the year for which the budget is being created. Select either the Year 1 or Year 2 check box to indicate which year the current budget year should be applied.
Numbers of Forecast Years - To apply long-range budget forecasting as a default setting for your organization, in Number of Forecast Years enter the number of years that your organization will forecast for the budget. This number represents the additional columns of budget year data in addition to your current annual budget year.
Forecast Initialization Method - select a forecast initialization method to determine the basis for initializing the forecasted budget.
Annual Budget Levels Tab
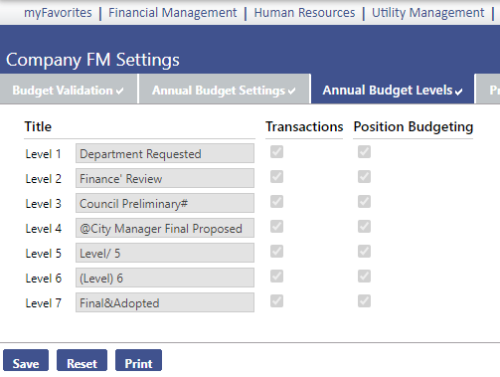
Maintenance > Financial Management > Company FM Settings > Annual Budget Levels Tab
The Company FM Settings/Annual Budget Levels screen is used to establish the budget levels and their behavior. Up to 7 levels can be established for the budget process. These levels typically involve an initialized level where a starting number is establshed and then a number of levels that may involve amounts requested by departments, finance, and management. The number of levels to utilize and the description for each budget level is established here.
Once the level descriptions have been defined, the Transactions check box can be checked if applicable for any level of the budget. Transaction based budgeting is a more detailed, optional way to make budget entries where, instead of entering a budget amount by GL account, the budgeted amount by GL account is calculated based on any number of Transactions that are created for the line item. Each transaction consists of a Description, a Cost per Unit and the Number of Units.
If the Position Budgeting module is being utilized, check the budget levels where the amounts calculated in Position Budgeting will be swept in the Annual Budget process.
Budget Methods
Budget Methods are utilized to control how General Ledger accounts are budgeted in the Annual Budget process and also how they are initialized. It is not done by individual general ledger account but rather by the Account Classifications in which they are grouped.
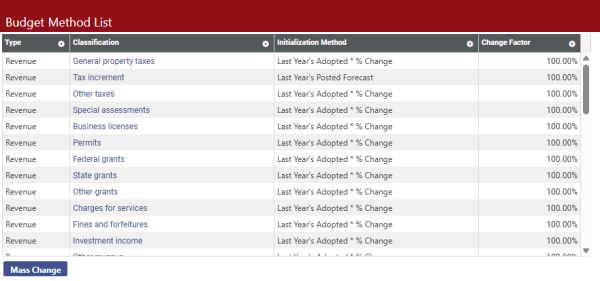
Financial Management > Annual Budget Processing > Budget Preparation > Budget Methods
The Budget Method List screen reflects all of the Revenue and Expense Account Classifications that have been established. Budget initialization calculation can be established by classification and are referred to as Initialization Methods. The default Initialization Method will be populated from what was defined within the Company FM Settings page on the Annual Budget Settings tab. Each one of the Account Classifications can have a separate Initialization Method if needed.
In order to modify an Initialization Method on one of these Account Classifications, click on the Classification Name and a pop up box will appear as seen below:
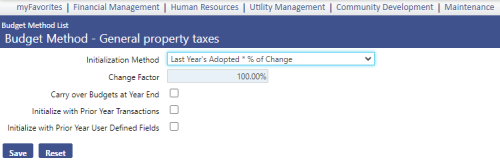
Budget Method Set-up
Initialization Method – Choose the method that would be suitable for initializing the budget for every account that resides within the classification.
Miscelleanous Transactions – This method will force budget entry by Transaction for this account classification. The ability to enter a budget amount for any account within this classification will be removed. Budget amounts for GL accounts within the classification will be equal to the sum of the transactions created. If the option to Initialize with Prior Year Transactions is not selected, then the budget will initialize to $0.
Last Year’s Actual * % of Change - Each GL account’s budget will be initialized based on a calculation of the prior year actual total multiplied by a user defined change factor.
Last Year’s Adopted * % of Change - Each GL account’s budget will be initialized based on a calculation of the prior year adopted budget multiplied by a user defined change factor.
Last Year’s Amended * % of Change - Each GL account’s budget will be initialized based on a calculation of the prior year amended budget multiplied by a user defined change factor.
Greater of Actual/Adopted/Amended * % of Change - Each GL account’s budget will be initialized based on greater of the prior year Actual/Adopted/Amended by a user defined change factor.
Actual * 5 year Trend – Each GL Account’s prior year actual will be multiplied by the change factor. The change factor equals the average change (positive or negative) for the GL account over the last 5 years.
Adopted * 5 year Trend – Each GL Account’s prior year adopted budget amount will be multiplied by change factor. The change factor equals the average change (positive or negative) for the GL account over the last 5 years.
Amended * 5 year Trend – Each GL Account’s prior year amended budget amount will be multiplied by change factor. The change factor equals the average change (positive or negative) for the GL account over the last 5 years.
Greater of Actual/Adopted/Amended * 5 year Trend - Each GL account’s budget will be initialized based on greater of the prior year Actual/Adopted/Amended multiplied by change factor. The change factor equals the average Actual/Adopted/Amended change (positive or negative) for the GL account over the last 5 years.
Position Budgeting – This method will involve budget amounts for the GL accounts within this classification being created by Promoting the Position Budget calculations. The ability to enter a budget amount for any account within this classification will be removed.
Initialize with Zero Balance – This method will drive the initalized amounts to be zero for all accounts within the classification.
Change Factor – A Change Factor can be chosen to increase or decrease the dollar amounts when the budget gets initialized according to the Initialization Method chosen above.
Carry Over Budgets at Year End – If this selection is made, all remaining budget amounts left at the end of the fiscal year (when the soft close is processed) will be carried into a Budget Adjustment increasing the budget for the following year for every account that resides within this Classification. This functionality works in conjunction with a setting on Funds of the same name. When soft close is processed, the system will look for Funds and Budget Methods marked for Carry Over Budget at Year End and will the create the budget adjustments only where the Fund and Budget Method both have the option selected.
Note: the ability to carry over budgets related to un-used purchase orders is addressed elsewhere in the software. This selection is not necessary for that process.
Initialize with Prior Year Transactions – This selection will drive the Detail Transactions that were entered for budgeted accounts in the prior year’s budget to be recreated for the current fiscal year during budget initialization.
Another way to modify the Initialization Methods for Account Classifications is to utilize the Mass Change button from the Budget Methods screen. Once this button is clicked, the system will provide a pop up box as seen below:
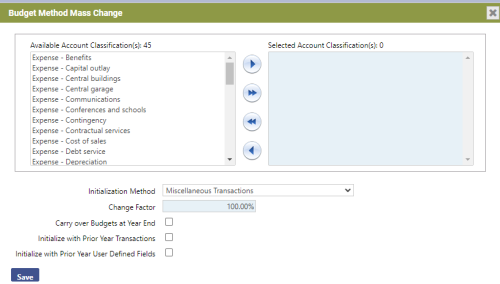
Budget Method Mass Change
This screen will allow for a mass change of the Initialization Methods for selected Account Classifications by selecting the desired Classifications and moving them to the box on the right. Additionally, Change Factor, Carry over Budgets at Year End and Initialize with Prior Year Transactions selections can be changed in Mass. Click Save once all of these choices have been selected.
User Defined Fields (UDFs)
Maintenance > new world ERP Suite > Security > User Defined Fields.
User defined fields can be used in Annual Budget Processing to capture additional information around a budget line item. To set-up User Defined Fields, go to the User Defined Field list screen.
First, select the appropriate Record Type. The Record Type for Annual Budget Processing UDFs will be Budget Accounts.
The ability exists to categorize UDFs by Section Headers for organized presentation on the UDF screen. If a substantial number of UDFs are to be utilized, this can be helpful.
If UDF Section Headers are desired, they can be set-up by selecting the Maintenance Type of Section Headers
To add a Section Header, click the New button.
The Section Header description should contain the description of the category.
Sequence number field will sequence the Section Headers on the UDF screen in numerical order.
Creating User Defined Fields
To add user defined fields, change the Maintenance Type to Attributes, then click the New button to add a new field.
The Add User-Defined Field Attribute pop-up will appear.
Adding a User Defined Field
Name – This is the title of the User Defined Field.
Section Header – If appropriate, select the Section Header.
Sequence Number – This will determine the order in which the field is presented within the section header.
Data Type - This is a drop-down with the following options:
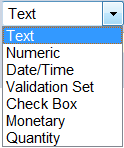
The UDF Date Type Drop-down window
Text – Select this option if the desired field should be free form text. If selected, an additional field will request the maximum number of allowable characters for the field. The options for this entry is 1 to 999.
Numeric – Select this option if you wish to have a number entered in the user defined field. If selected, an additional prompt will request the minimum and maximum allowable values. These can be set to negative amounts if desired.
Date/Time – Select this option if you wish to have a Date/Time for the User Defined Field.
Validation Set – Select this option if you would like the UDF to present the user with a drop-down from a validation set. If selected, an additional prompt will require specification of the validation set to use. If an additional validation set is required, go to Maintenance>new world ERP Suite>System>Validations Sets>Validation Set List and click New to create an additional validation set and its entries. A unique (unused) number will be required for any new Validation Sets created.
Check Box – Select this option if you wish the UDF to be a simple True/False utilizing a check box.
Monetary – This allows for entry of a monetary figure. If selected, the user may specify the desired number of decimal places which can be useful for per unit information.
Quantity – Select this option if you wish to record quantity information in the UDF. If selected, an additional prompt will request the number of decimal places to be recorded.
Required – The Required field will only require that a user put an entry into that field when accessing the UDF screen in Budget Maintenance. It does not require that the user actually access the screen and it does not set a requirement in the system that the UDF is completed in order to advance or adopt the budget.
After creating the desired UDFs, the list of UDFs will populate the User Defined Field List screen. They can be edited or changed by clicking on the Attribute Name to re-open them.
Security Set-Up
Security for the Annual Budget Processing is controlled through User Based Security and Application Permissions. There is no Process Manager functionality within the module. Rather, workflow is controlled through the access to Permissions which will control what the user is allowed to enter or change and User Based Security which controls which budget levels they are allowed access to.
In simple terms, departmental users may be provided with security to a single budget level (whichever level is designated to record department requests) in User Based Security. In Application Permissions, those same users will be provided access to perform budget requests, create notes, attach documents and so on. This will allow the users to make their entries but only at the appropriate budget level.
User Based Security/General Tab
Maintenance>new world ERP Suite>Security>User Based Security
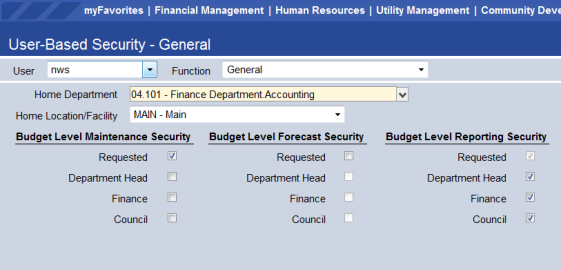
Budget Level Maintenance Security
The check boxes contained within this area are driven by the Budget Levels that have been established in Company FM Settings. Selecting the check boxes for individual levels within this area will allow the user to perform any budget functions for which they have application permissions, for that level. Not selecting a level will deny the user maintenance access to the unselected level. This feature will frequently be used to provide departmental users access to a designated level where they can enter in their budget requests.
Budget Level Forecast Security
The check boxes contained within this area are driven by the Budget Levels that have been established in Company FM Settings. Selecting a level will allow the user to sweep forecasting information into the current budget when it is at a selected level.
Budget Level Reporting Security
The check boxes contained within this area are driven by the Budget Levels that have been established in Company FM Settings. Many of the Annual Budget Processing Reports allow the user to select the columns that they would like to include on the report. Among the options for the columns selected are the different budget levels. Selection of budget levels in this area will allow the user to include the selected budget level in Annual Budget reports.
User Based Security/Sub Ledger
The Sub Ledger area of User Based Security allows for filtering of the General Ledger Organization Sets that a user can work with in the Annual Budget Module. This can be utilized to provide administrators access to all organization sets while limiting departmental users to their own areas.
Maintenance>new world ERP Suite>Security>User Based Security>Sub Ledgers
To access the sub-ledger area in User Based security, drop-down the Function and select Sub Ledgers. After accessing the Sub Ledger area, drop-down the Ledger and select Annual Budget. Then select the GL Organizations tab.
Listed in the Available Organizations will be all GL Organization Sets. Select those organization sets for which the user should have access and move them to the Selected Organizations box on the right using the arrow buttons. When complete, click the Save button.
The Organization Sets selected here will drive what the users can access within the budget module and reports in the Annual Budget header. The Organization Sets selected will not drive reports under the Budgetary Reports header. Organization set access to Budgetary reports is driven by GL Organization sets selected under the General Ledger sub ledger.
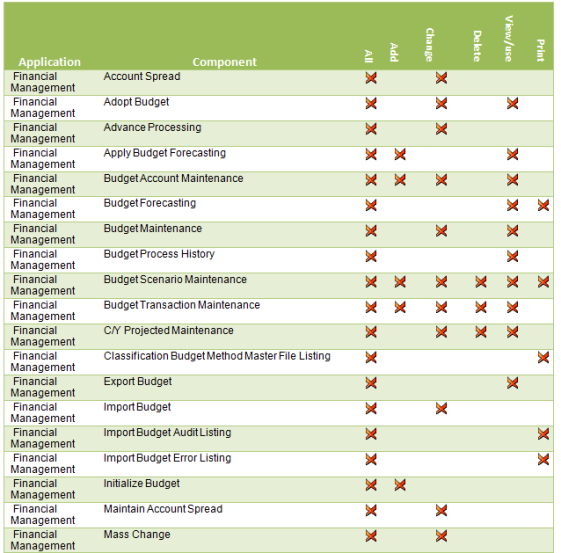
Application Permissions
Application Permissions for Annual Budget Processing can typically be completed effectively within two general template groupings. The first would be intended for budget administration purposes and would generally contain all permissions within the Budget Processing feature group. The second would be intended for decentralized/departmental users and would provide access to the budget request areas but not include the administrative functions such as initializing or advancing the budget.
Permission Type – Company Applications
Feature Group – Budget Processing

|
Component |
Description |
|---|---|
|
Account Spread |
Provides the ability to spread the budget across months. This should only be activated if the budget is being spread. |
|
Adopt Budget |
Ability to Adopt the budget. This is a budget administrator function. |
|
Advance Processing |
Ability to advance a fund to the next budget level. This is a budget administrator function. |
|
Apply Budget Forecasting |
Ability to sweep budget forecasting amounts into the annual budget. |
|
Budget Account Maintenance |
The ability to see and use the budget account screen. Any user entering budget amounts will need access to this permission. |
|
Budget Forecasting |
The ability to see and use the Budget Forecasting area. |
|
Budget Maintenance |
The ability access and use the Budget Organization list screen. Any user entering budget amounts of accessing the annual budget will need access to this permission. |
|
Budget Process History |
The ability to see an inquiry which displays budget history for the GL account selected. Any user entering budget amounts will generally have access to this inquiry. |
|
Budget Scenario Maintenance |
The ability to create scenarios for use in Budget Forecasting. |
|
Budget Transaction Maintenance |
The ability to see and add budget transactions. If users need the ability to add transactions into the budget, this permission will be required. |
|
C/Y Projected Maintenance |
Determines whether or not a user will be able to select the current year’s Actual (Estimated) (Editable) column for Column 3 in Selected Columns on the Budget Accounts page. |
|
Classification Budget Method Master File Listing |
The ability to see and maintain budget methods. This is typically a budget administrator function. |
|
Export Budget |
The ability to export the budget. If a Budget Export dll has been incorporated, this permission will be required to execute the export. |
|
Import Budget |
The ability to import the budget from a CSV. |
|
Import Budget Audit Listing |
The ability to run the Import Budget Audit Listing report. |
|
Import Budget Error Listing |
The ability to run the Import Budget Error Listing report. |
|
Initialize Budget |
The ability to initialize the budget. This is typically a budget administrator function. |
|
Maintain Account Spread |
The ability to maintain a budget spread. Only applicable if spreading the budget by month. |
|
Mass Change |
The ability to perform a Mass Change to increase or decrease all accounts within an Organization Set by a selected factor. This functionality carries some risk of inadvertently changing many accounts at once. |
|
Mass Spread |
The ability to spread the budget over entire classifications and organizations. Only applicable if spreading budgets. Because this feature allows spreading of large numbers of accounts at once, it carries some risk of inadvertently making a mass change incorrectly.. |
|
Previous Level Maintenance |
The ability to change amounts into a prior budget level. This is typically a budget administration function. |
|
Un-Initialize Budget |
The ability to Un-initialize the budget. This is a budget administrator function. |
|
Working Budget Year |
The ability to update the budget year. This is a budget administrator function. |
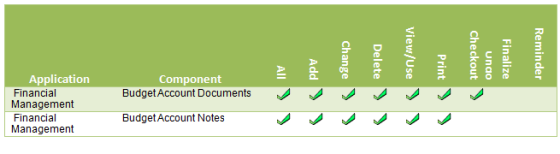
Permission Type – Company Applications
Feature Group – Budget Processing
|
Component |
Description |
|---|---|
|
Budget Account Documents |
Ability to add, view and work with documents in budget maintenance. Any user attaching documents to the budget will need this permission. Despite the availability of a “Change” permission, document attachments cannot be changed. |
|
Budget Account Notes |
Ability to add Notes in budget maintenance. Any user attaching notes to the budget will need this permission.
|
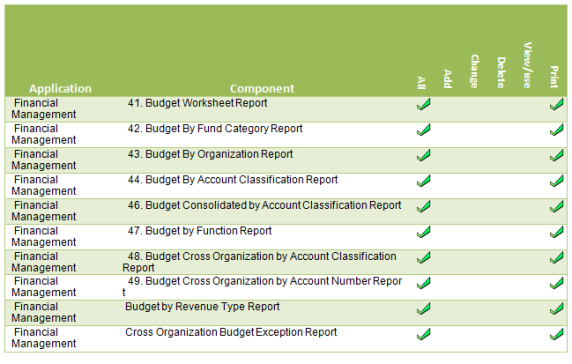
Permission Type – Company Applications
Feature Group – Annual Budget Processing Reports
|
Component |
Description |
|---|---|
|
41. Budget Worksheet Report |
Ability to run the Budget Worksheet Report. |
|
42. Budget By Fund Category Report |
Ability to run the Budget By Fund Category Report |
|
43. Budget By Organization Report |
Ability to run the Budget By Organization Report |
|
44. Budget By Account Classification Report |
Ability to run the Budget By Account Classification Report |
|
46. Budget Consolidated by Account Classification Report |
Ability to run the Budget Consolidated by Account Classification Report |
|
47. Budget by Function Report |
Ability to run the Budget by Function Report |
|
48. Budget Cross Organization by Account Classification Report |
Ability to run the Budget Cross Organization by Account Classification Report |
|
49. Budget Cross Organization by Account Number Report |
Ability to run the Budget Cross Organization by Account Number Report |
|
Budget by Revenue Type |
Ability to run the Budget by Revenue Type Report |
|
Cross Organization Budget |
Ability to run the Cross Organization Budget Exception Report |
Annual Budget Processing
Budget Initialization
Financial Management > Annual Budget Processing > Budget Preparation > Initialize Budgets
Budget Initialization will begin the Annual Budget Process for the fiscal year and funds selected.
To initialize the budget, go to the Initialize Budgets screen. First select the Budget Year that will be initialized. This is the fiscal year to be budgeted. Select the funds to initialize and click the Initialize button. The process of initializing the budget will run and then a confirmation message will appear for every fund that has been initialized and the total amount currently at the initialized level. This amount will be driven by the budget methods that have been set up.
Un-Initialize Budgets
Un-initializing a budget will clear out all entries made into Annual Budget processing for that fund/fiscal year. Un-initialization can be done up until the point that the budget has been adopted. Once a final adoption has been executed, the Budget is no longer available in Annual Budget Processing for that fiscal year and is no longer eligible for un-initialization.
Note: The system cannot undo the Un-Initialization process. Un-initializing the budget will require starting the annual budget process over for the fund/fiscal year.
To un-initialize a budget, go to Un-Initialize Budgets:
Financial Management > Annual Budget Processing > Budget Preparation > Un-Initialize Budgets
Choose the Fiscal Year and Fund that you would like to Un-initialize and then click the Un-Initialize button. The system will produce a message when the un-initialization is complete.
Annual Budget Processing – User Entry
Budget Maintenance is the principal working area within Annual Budget Processing. Users will go to this area to enter budget request amounts, create budget transactions as well as attach supporting documents, notes or comments.
Budget Organization List
Financial Management>Annual Budget Processing>Budget Processing>Budget Maintenance
The Budget Organization List is a list of organization sets for which the user is responsible for preparing the revenue and/or expenditure budgets. To begin, click on the Organization hyperlink (highlighted in blue).
The grid within the screen will display a list of GL Organization sets for which the user has access. They will be displayed only if the user also has access to the current budget level. In the example above, the user would need access to the Budget Level “Requested.”
The columns on the grid are:
Complete – This check box can be utilized to denote that entry for an Organization set is complete at this budget level and the budget can be advanced. The check box does not have any functionality behind it and it is not required that it be checked in order to advance an organization set to the next budget level.
Organization – This is a hyperlink into the budget detail for the Organization Set.
Description – Description of the Organization Set.
Budget Level – The current budget level of the Organization Set.
Revenue & Expense – The total budgeted amount entered for the respective account type for the Budget Level.
Budget Accounts
The Budget Accounts screen is the budget entry screen for all non-Position Budgeting related items. Amounts can be entered directly into cells that are not shaded gray. Items shaded in grey represent amounts calculated by the Position Budgeting module. Any cells that are shaded represent either amounts calculated from Position Budgeting or relate to GL Accounts belonging to a Budget Method (Classification) which requires Transaction Based Budgeting.
The screen is accessed by clicking on an Organization Set number in the Budget Organization Set list.
The top left half of the screen presents summarized information about the Organization Set including the Account Type that is being viewed, the Budget Year, the budgeted Amount of the Previous Level, budgeted amount of the current level and difference between the current and previous level for the Organization Set.
Column Selection
On the top right of the screen is an area for Selected Columns – This feature provides users the ability to control what columns will be available in this screen.
Budget Maintenance Grid Configuration
When clicking on the Icon for Selected Columns, the Budget Maintenance Grid Configuration screen will appear.
This screen is used to customize what will appear in the grid on the lower half of the screen. Selections made here will be saved so that the user does not need to re-configure it each time they return to the screen.
Include Prior Year Est. – Prior Year Estimated is a way to manually estimate where budgeted accounts will end up for the current fiscal year, as a reference during budget processing. By selecting this check box, a second enterable field (the first being the budget request amount) will be added to the grid to record this information.
The Prior Year Estimated entry column as Shown In Budget Accounts
Column 1, Column 2, Column 3
These drop-downs allow for the selection of what columns will appear in the entry grid on this screen.
The options are:
Amended Budget - 5 previous years are available.
Adopted Budget – 5 previous years are available.
Actuals – 5 Previous Years are available.
Actual (Projected) – This column will take Year To Date information and make a calculated projection for the full current fiscal year based on the value selected in the Calculate Current Year Extrapolate Balance Method drop-down located on the Company FM Settings Annual Budget Settings tab. Available options include Extrapolate Value Over Full Year or Extrapolate Based On 5 Year History.
Actual (Estimated)(Editable) – This will add the prior year estimated as an enterable field.
Additional Options within the Budget Maintenance Grid Configuration
Show Forecast – This will add a column to reflect up to 5 future years of forecasted amounts.
Show Attachments – Enables adding Comments, Notes, Documents and Remote Documents. This would only be unchecked to conserve screen real-estate. A selection here does not require that these items are utilized.
Show UDF – Provides a column with a hyperlink to add User Defined Field information to the budget.
Show Transactions – If selected, a column will be provided that identifies those budgeted GL accounts with Transactions applied to them.
G/L Organization Set Attachments
This area displays three buttons for attachments that apply to the entire organization set and not just to a specific line item. The categories of attachments here are: Notes, G/L Org Documents and G/L Org Remote Documents. All three of these can be accessed for inquiry purposes in GL Account Inquiry after the budget has been adopted.
Summarization Level
The Summarization Level drop-down on the Budget Account screen
This drop-down can be utilized to view summarized totals by account classification totals in the grid.
Budget Account Entry
The lower half of the screen is the grid where the budget work will be completed.
Although customizable in the grid configuration screen, the columns within the grid may include:
Account – The account #. This column will always appear.
Description – The description of the account. This column will always appear.
Attachments – See below for additional information. When an item has already been entered against the current budget, it will be in yellow.
UDFs – User Defined Fields. See below for additional information.
Selected Columns – user selected reference columns to assist with budget entry.
Budget Entry Column – This column is for entry of the budget request at the current budget level.
Attachments – This column contains hyperlinks for the following.
- Comments
- Notes
- Documents
- Remote Documents
These are covered in detail in the following sections.
Adding Comments
Free form comments can be entered into this field. These comments can be printed on the Budget Worksheet Report and once the budget is adopted, they can be viewed in General Ledger Account Inquiry/Budget History.
To add a comment, click on the Comment Icon.
Enter the comment and click OK to save.
Adding Notes
The notes feature is similar to comments but adds additional communication options. The difference between a comment and a note is that a note can be sent to another user while a comment simply stays with the account line item. If you send a note to another user, the note will appear in that user’s “myCalendar” section of the home page with a link to the budget line item. You can create a note by clicking the notes icon. Notes can be accessed in GL Account inquiry after the budget is adopted. Unlike comments, notes cannot be printed on the Budget Worksheet Report.
To add a Note, click on the Notes icon. A pop-up will appear that will reflect any notes that have been added to the line item. To add a new Note, click on the “+ Add” icon.
Subject line – Enter a title that broadly explains what the note is about.
Message – Enter the body of the note.
Users – If you wish to forward the note to another user, select the user(s) from the select box on the right side of the screen. The users you select will then receive the note in their “myNotifications” window on the Home Screen.
From there, the user can click on the Message hyperlink to see the Budget Accounts screen which will allow them to see the amount requested, note and any other information added to the Organization Set.
Alternatively, the user can click on the Notes icon to simply see the note itself.
Attaching Documents
Microsoft Word and Excel, PDF, image and other types of documents can be attached as reference or to justify the line item budget requests. To attach a document, click the document icon in the grid.
To add a new document, click the New button.
In the Upload Document pop-up screen, select the file type from the File Type drop-down menu. The most common files types are .doc for Microsoft Word documents, .xls for Microsoft Excel, and ..pdf for Adobe documents. Type a file description under the Description drop-down menu. This description will be the documents name in New World ERPbut does not have to be the same as the file name of the document that is being uploaded. Finally, under the File drop-down menu, click Browse and select the file then click OK to attach.
Once the document is attached, it should be “Checked In” to upload the document to the server and make it available to other users. With the document highlighted, click on the Check-In button then click the OK button on the screen prompt to complete the process.
Once completed, close out of the document pop-up by clicking on the red X on the top right corner.
The attached document will now appear in the document menu. To access, the document, click View to open the document and the system will prompt for opening the actual document.
Remote Documents
Remote documents are utilized in place of Documents when a URL based document imaging system is in place. To add a remote document, click on the Remote Document Icon, then click the New button.
Adding a Remote Document
Enter a name for the document along with the URL of the document on the document server and click OK.
User Defined Fields
User Defined Fields are customizable fields that can be utilized to track information specific to a particular customer. If utilized, they are accessed by selecting the icon in the UDF column.
UDF fields may come in the forms of check boxes, dates, amounts, quantities, freeform text or a drop-down list.
They can also be set to required. If the field appears in a cornsilk color as “Associated Projects” does above, the UDF is a required field.
Budget Amount Request – The column farthest to the right is for entry of the budget request amount at the current level. To enter an amount into this field, simply enter the amount and tab out of the field.
The amount field may sometimes be grey and not allow entry. This occurs under two circumstances:
- The GL Account is set up to be driven by the Position Budgeting module.
- The GL Account requires Transaction Based Budgeting.
Buttons on the Budget Accounts Screen
Save - This saves any budget amount entries that have been made on the screen.
Delete - This removes the highlighted line from the budget entry process.
Reset - This resets values back to the last time you saved.
Transactions - If there are transactions from Position Control related to this line item, you can click here and see the detail of those transactions. If not, the screen will display with no items to view.
Inquiry- This button opens up the G/L Account Inquiry in New World ERP for the line you have highlighted so you can get more detail on current or prior year budget and/or actuals.
History - This will reflect entries into lower budget levels.
Five Year Trend - This button opens a window displaying a five year trend for budget and actuals for that line item.
Add Accounts - If you remove a line from the budget entry process and would like it back, or if you have requested a new line from finance, when you click on this button, those lines will be available to add.
Budget Transactions
As supporting information for budget requests, detail transactions can be entered into the transaction area to break down all or some of the individual items responsible for the budget request. To enter a budget transaction, highlight the General Ledger account row associated with the transaction and click the Transaction button.
The Budget Transaction entry window.
Click New and add information into the transaction fields.
Complete the line by entering a description of your purchase, the number of units, and the amount per unit. Click Save to complete this line or Save/New to add additional lines.
If you want the sum of the transactions you entered to be the new budgeted amount, click the Apply Transaction Total as Budget Amount button. When you breadcrumb back to Budget Accounts, the budgeted amount will be populated.
Continue to enter amounts into the Budget Accounts screen for the organization. When finished, click Save and breadcrumb back to the Budget Organization List.
If entry into the Organization is complete, check the complete check box for that organization.
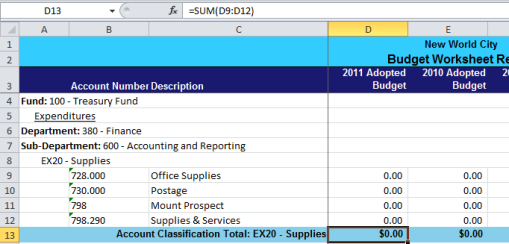
The Budget Worksheet
The Budget Worksheet is an Annual Budget reporting tool that allows for report column selection by the user in a similar fashion to the column selection within the Budget Accounts screen.
The execute the report, navigate to Financial Management > Reports > Annual Budget > Budget Worksheet
Report Selection Criteria:
Budget Year - Select the Budget Year.
Account Type - Select either All, Expense or Revenue.
Sort by Account Type - If selected, the report will list all revenues and then all expenses. If cleared, the report will list Organization Set and then all Revenues and then Expenses within the Organization Set and then move on to the next Organization Set.
Subtotal by Classification Level - This drop-down will drive account classification subtotals on the report. If desired, the sub-totals can be provided at classification levels, 1 to 3.
Summarize to Organization Level - This setting would typically be left blank. As an exception, the report can be run to summarize account information at a higher organization set level.
Page Break Level - This setting is only meaningful if you plan to print the report. Page breaks can be established by utilizing this field.
Include Comments - Select an option here if you wish to print Comments that have been entered into the budget. Comments can be printed along with individual line items or as grouped together in a footnote.
Print Transactions - If this box is selected, the Transaction Type, Budget Level, and Transaction Order become available.
Transaction Type – Select whether you would like to see Position Budgeting details, Budget Transaction Details or both.
Budget Level - Select the budget level that you would like the transactions printed from.
Transaction Order - Transactions will be sorted based on the selection here. The options are Alphabetical, Entry Order or by Amount.
Create Microsoft Excel file -This gives you the option of sending your report directly to Excel from myReports. The Excel export will contain summary formulas in subtotal fields.
On the bottom of the screen are three tabs for filtering the report:
- Organization - Select the general ledger organization sets that you would like to include on the report.
- Accounts - Select the accounts you would like to include.
- Balances to Include - This tab will include a number of optional column that you can pick from to include on the report. Up to 7 columns can be selected for a single report.
Working With Columns on the Budget Worksheet
Calculated Column – If you would like to compare two of the columns on the report, that can done utilizing the calculated column. To set up a calculated column, move it over to the selected box and then double click on it. The options on the right side of the screen will become active.
Title – Enter the name of the column that you would like to appear on the report
Formulas:
A-B – The report will show the actual increase decrease by reflecting the result of Column A – Column B.
A/B – The report will show a % comparison of Column A divided by Column B.
(A/B)/B - The report will show a % increase or decrease between Column B and Column A.
Available fields that may be included in the calculation:
Adopted Budget – Up to 5 years of adopted budget amounts can be included.
Amended Budget – Up to 5 years of amended budget amounts can be included.
Current Year Actual Amount – Include the Year To Date Actual for the current fiscal year.
Project Amount – Include the projection for the current fiscal year. The projection method will be based on the setting selected in Company FM Settings.
Estimated Amount – Include the amounts that have been entered into the Prior Year Estimated column in budget entry. These represent manual projections for the current fiscal year.
Actual Amounts – Up to 5 years of actual year-end account balances can be included.
Budget Levels – Budget Level amounts for the current year. Any levels higher than the level which the budget is currently at will be $0.
Forecast – If utilizing the Forecasting module, these amounts can be presented
If you would like to save your selections for the next time you need to run the report, click the Save button if you would like to save this report.
Once the criteria are specified, click either the Print button to execute the report.
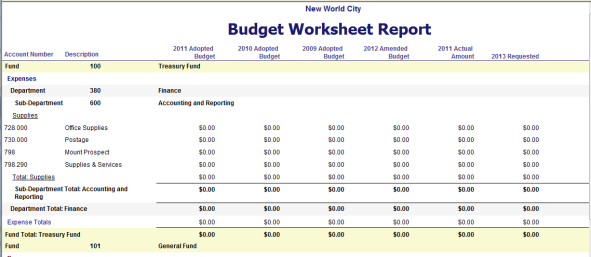
A budget worksheet report
Exporting the Budget Worksheet to Excel
If the Export to Excel check box was selected, the report will not generate in a pop-up but will be sent to myReports. To open the Excel file, go to myReports, click on the report and then select Download File. A Windows File Download dialog box will appear. Click Open to open the file.
The Excel file will open. The file does have some preset formatting and formulas will be active for sub-totaling.
The Budget Worksheet Excel export
Advance Budget
When an organization set has been completed for a particular budget level, it can then be advanced to the next budget level. To execute that process, go to Advance Budget.
Financial Management > Annual Budget Processing > Budget Processing > Advance Budget
In the Level To Advance From drop-down, select the desired level. Any organization sets within that level will appear in the Available Organizations. Move the desired Organizations to the Selected Organizations box and click Advance to advance them to the next level.
Budget Adoption
Financial Management > Annual Budget Processing > Budget Processing > Adopt Budget
Once all organization sets have been advanced to the highest budget level, the budget is eligible to be adopted. Budget adoption is done by fund.
Budget adoption will post the budget and create the Adopted Budget journal entry for the fiscal year so that budgetary reporting and budget validation can begin. If the spread has not been utilized, the entire budget amount will be posted to the 1st day of the fiscal year.
Budget Year – Select the budget year that is being adopted.
Department – This will be the department associated with the Journal Entry that is being created. It is typically associated with Finance or a centralized journal entry department that has been created.
Final Budget - The Final Budget check box is used to indicate whether this is the Final Budget adoption. It has significant functionality. If the check box is not selected, the budget will be created, but will also remain at the highest level of the budget in Annual Budget Processing where it can be changed and re-adopted. This can be utilized for the purpose of a temporary budget.
If your budget process is completed for the fund, be sure to check Final Budget.
Annual Budget Processing Reports
Annual Budget Processing reports can be found by navigating to Financial Management > Reports > Annual Budget.
Budget Worksheet Report- This is the most frequently used reporting tool for Annual Budget Processing reporting. Please refer to the detailed guide on executing this report.
Budget by Organization Report- This summary report will provide summarized information by Organization Set totals. The report includes column selection functionality.

Budget by Organization Report
Budget by Account Classification- This summary report will provide Account Classification totals by fund. The report includes column selection functionality.
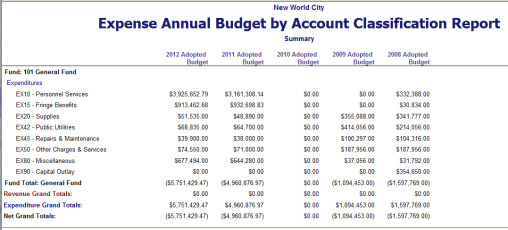
Budget by Account Classification Report
Budget by Fund Category- This report will provide budgetary information across funds broken down by fund category. The report includes column selection functionality.

The Budget by Fund Category Report
Budget by Revenue Type - This report displays budget by function of government and would be useful only if you were budgeting for multiple funds and wanted summarized data. The report includes column selection functionality.
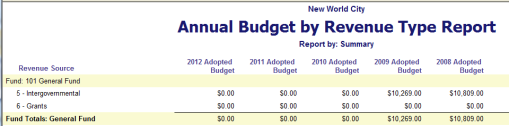
The Budget by Revenue Type Report
Budget Cross Organization by Account Classification- This report summarizes information across selected organizations sets and funds by account classification. The report includes column selection functionality.
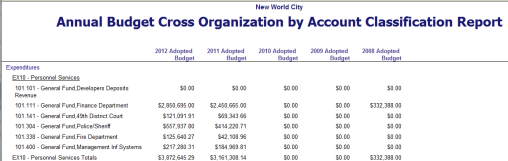
The Budget Cross Organization by Account Classification Report
Budget Cross Organization by Account Number Report - This report is account focused and displays account totals across organization sets. It includes column selection functionality.
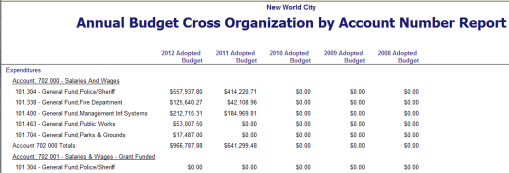
The Budget Cross Organization by Account Number Report
Budget Transaction Report- This report will report all Budget Transactions for the selected organizations.
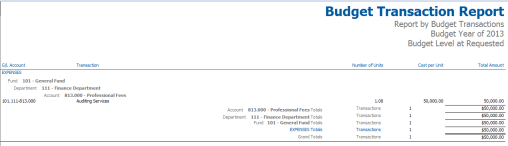
The Budget Transaction Report